Residential sprinklers are the first choice for protecting residential occupancies. This type of sprinkler is fast response and higher wall-wetting characteristics than spray sprinklers. In this article, we will design the residential sprinkler system for the suite, as illustrated in Figure 1. The north direction is indicated for reference. Our design is based on the NFPA 13, 2016 Edition standard.
Coverage Area of Residential Sprinklers:
One important difference between residential sprinklers with standard spray, CMSA, and ESFR sprinklers is that their coverage area depends on the available pressure. Refer to Section 8.10.2.1 of NFPA 13; the coverage area shall be per the manufacturer`s listing. Suppose a manufacturer makes a residential pendent sprinkler model PND100. The coverage area table can be found in the datasheet of this model as follows:
ft × ft
(m × m)
psi
(bar)
(3.7 × 3.7)
(0.5)
(4.3 × 4.3)
(0.62)
(4.9 × 4.9)
(0.76)
(5.5 × 5.5)
(0.9)
(6.1 × 6.1)
(1.17)
Table 1 - Coverage area & pressure- Model PND100
According to this table, the model PND100 covers 3.7m × 3.7m with 0.5 bar (7 psi), and 6.1m × 6.1m if 1.17 bar (17 psi) is available.
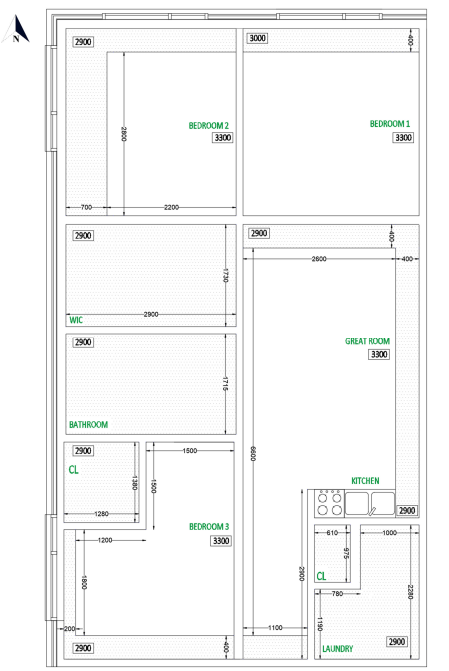 Figure 1 - Plan of suite
The coverage area of model PND100 is drawn in Figure 2:
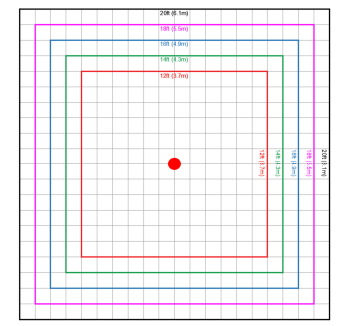 Figure 2 - Coverage area of model PND100
That manufacturer also produces residential sidewall model SW200. The maximum distance between the deflector and the ceiling on this model is 150 mm (6 in).
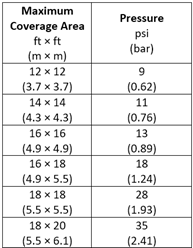 Table 2 - Coverage area & pressure- Model SW200
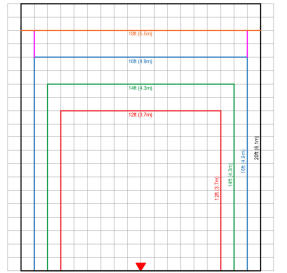 Figure 3- Coverage area of model SW200
We use both models to design fire sprinkler systems in the suite. Based on the flow test report and initial hydraulic estimation, we assume 2 bar (29 psi) pressure is available behind the most remote sprinkler. As a result, the pendent sprinklers can cover an area of 6.1m x 6.1m, while the sidewall sprinklers can cover an area of 5.5m x 5.5m.
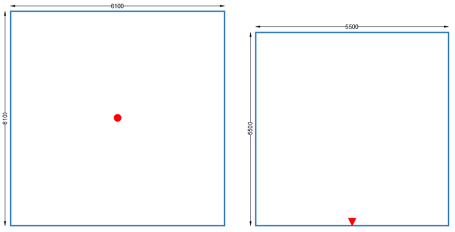 Figure 4 - The coverage area of the pendent and sidewall sprinkler based on the available pressure
Identifying Optimal Piping Routes and Sprinkler Orientations:
Before locating the sprinklers, we should study the building layout to identify optimal piping routes and find the adequate sprinkler orientation (Pendent or sidewall). To maintain aesthetics, we should minimize exposed piping by routing pipes behind suspended ceilings or within the soffits. For example, if we look at the section drawing of Bedroom 1, we see there`s no suspended ceiling, so we won`t locate a pendent sprinkler under the ceiling for aesthetic reasons.
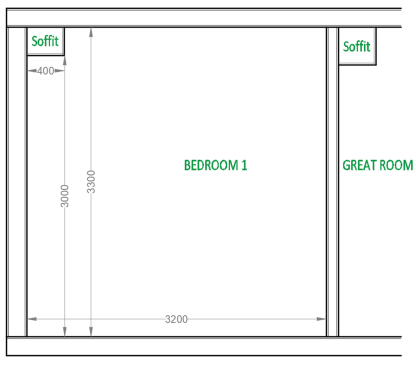 Figure 5 - Bedroom 1 (Section view)
In this room, we have two options for piping:
- Inside of the north soffit of the “Bedroom 1”
- Inside the north soffit of the “Great Room,” then penetrating the south wall of the “Bedroom 1” and installing the sidewall sprinkler.
We will study these options later.
For another example, the walk-in closet (WIC) has a suspended ceiling, so we will run the pipe above this ceiling and protect the room with the pendent sprinkler.
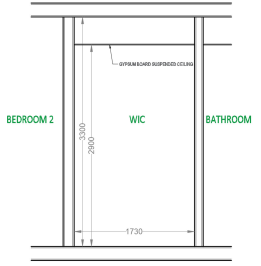 Figure 6 - WIC (Section view)
The 3D figure below, depicting a southeast view of the suite, illustrates a potential piping route. Dashed lines represent pipes within the soffit, while solid lines indicate pipes above the suspended ceiling.
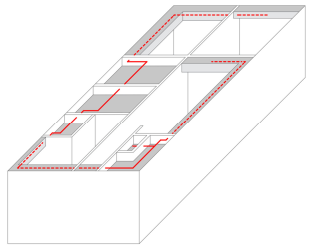 Figure 7 - Piping route (3D view)
Locating sprinkler in Bedroom 1:
We start by locating sprinklers from Bedroom 1 with a soffit at the north, which has an elevation of 3000 mm from the floor.
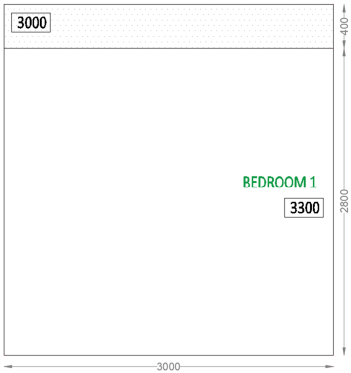 Figure 8- Bedroom 1
We have three options for installing the sprinklers:
Option 1: Installing sidewall sprinkler on the face of the north soffit:
As explained, the coverage area of the sidewall sprinkler is 5.5 x 5.5 m, based on the available pressure. By installing the sidewall sprinkler on the face of the soffit, the room area in front of the sprinkler will be covered, but the area behind the sprinkler (under the soffit) will remain unprotected. In the figure below, the blue hatched area represents the covered zone, while the red area indicates the uncovered portion.
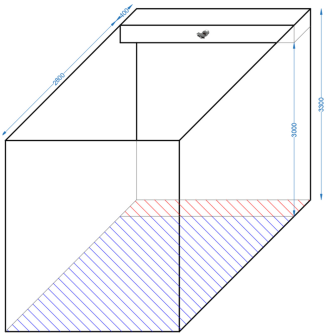 Figure 9- Installing the sidewall sprinkler on the face of north soffit
According to Section 8.10.7.1.5.1, when the sidewall sprinkler is installed on the face of the soffit, and the soffit's width exceeds 200 mm (8 in.), a pendent sprinkler shall be installed under it. In other words, if the width of the soffit is up to 200 mm, we are allowed to ignore the dry area behind the sprinkler.
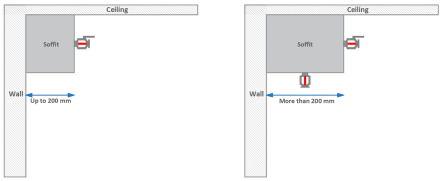 Figure 10- Protection requirement
In Bedroom 1, the north soffit is 400 mm wide; therefore, we must install a pendent sprinkler under the soffit to cover the area beneath it. To protect this room, we need one sidewall and one pendent sprinkler to meet the requirements of NFPA 13. In the below figure, the covered area by sprinklers is shown in blue.
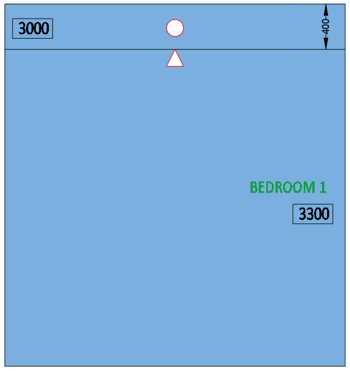 Figure 11- Option 1 (Plan view)
Option 2: Installing sidewall sprinkler on south wall:
As mentioned earlier, we can pass the pipe through the north soffit of the “Great Room” and then penetrate the south wall of “Bedroom 1” to install the sidewall sprinkler. In this case, the soffit in bedroom 1 will be an obstruction in front of the sidewall sprinkler.
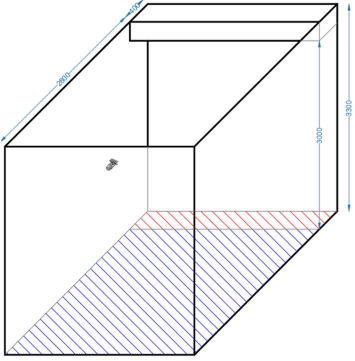 Figure 12- Installing the sidewall sprinkler on the south wall
In general, where an obstruction is in front of the sidewall sprinkler, and the water can only pass under it, we should follow the beam rule (Table & Figure 8.10.7.1.3). For the obstruction against the wall (like the soffit), NFPA 13 permits follow the “Soffit Rule” which is more liberal than the “Beam Rule”. Section 8.10.7.1.6 and Figure A.8.10.7.1.6 says that if the width and depth of the soffit are not more than 600 mm, the soffit will not be considered an obstruction.
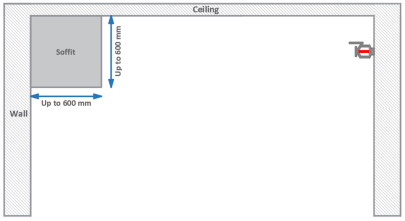 Figure 13- No protection is required for the area under the soffit
In Bedroom 1, the width of the soffit is 400 mm, and the depth is 300 mm; therefore, we can ignore the soffit as an obstruction. This means the sidewall sprinkler on the south wall can cover the area under the soffit.
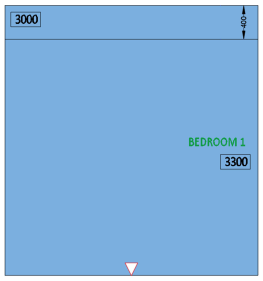 Figure 14- Option 2 (Plan view)
Option 3: Installing sidewall sprinkler on south wall:
The soffit creates the ceiling pocket in this room. In the figure below, the green shaded area shows the ceiling pocket.
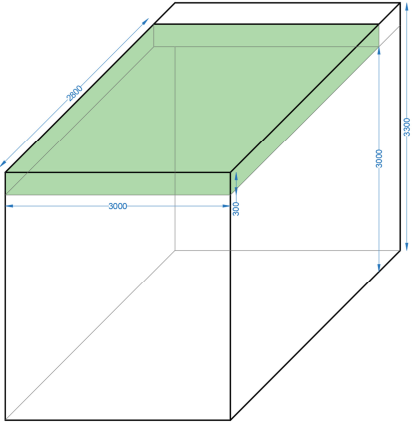 Figure 15- The ceiling pocket
Let`s calculate the depth and the volume of the ceiling pocket:
Depth = (Ceiling Height) – (Soffit Height)
= 3300 - 3000 = 300 mm
Volume = (Length of Ceiling Pocket) × (Length of Ceiling Pocket) × (Depth)
= 3000 × 2800 × 300 = 2,520,000,000 mm³ (2.52 m³)
With a depth up to 300 mm and a volume not exceeding 2.8 m³, the ceiling pocket rule per section 8.10.8 applies if the interior finish is noncombustible or limited combustible. Consequently, a single pendent sprinkler installed under the soffit can adequately protect the room. It should be noted that the distance between the pendent sprinkler and the room walls shall not be greater than half of the spacing. We assumed the coverage of the pendent sprinkler is 6.1 × 6.1 m, so the maximum distance from the walls shall not be more than 3.05 m.
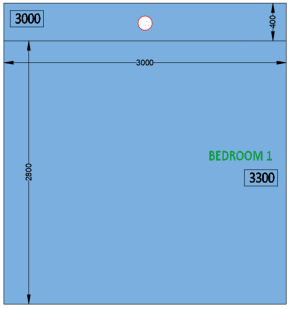 Figure 16- Option 3 (Plan view)
Locating sprinkler in Bedroom 2:
Bedroom 2 has two soffits on the north and west walls. The width of the north soffit is 400 mm, and the west is 700 mm. In this room, the ceiling pocket rule is not applicable because the depth is 400 mm.
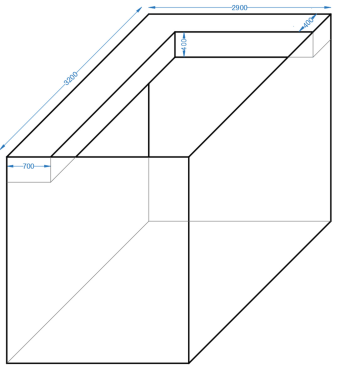 Figure 17- Bedroom 2
There are three options to protect this room.
Option 1: Installing sidewall sprinkler on the face of the west soffit:
When we install the sidewall on the face of the west soffit, the north soffit will be an adjacent obstruction for the sprinkler. The general rule for the obstruction adjacent to the sidewall sprinkler is the “Beam Rule,” but for obstruction against the wall, we can apply the “Soffit Rule.”
There are two sets of soffit rules in NFPA 13:
For the soffit`s width up to 600 mm (24 in): The soffit can be ignored as an obstruction based on section 8.10.7.1.4(4) and Figure 8.10.7.1.4(c). This means that no protection is required for the area under the soffit.
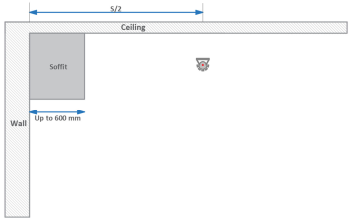 Figure 18 - No protection is required for the area under the soffit
For the soffit`s width more than 600 mm (24 in) and up to 800 mm (30 in): In this case section 8.10.7.1.4(3) and Figure 8.10.7.1.4(b) shall be met.
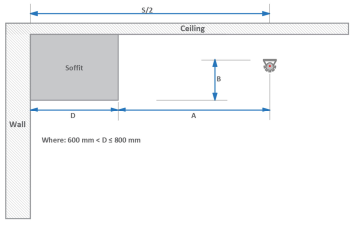 Figure 19 - If “A ≥ (D – 200 mm) + B”, no protection is required for the area under the soffit
In bedroom 2, If we install the sidewall sprinkler on the west soffit, the 400 mm wide north soffit will not be considered an obstruction according to section 8.10.7.1.4(4) and Figure 8.10.7.1.4(c), so we are permitted to ignore it. Per Section 8.10.7.1.5.1, we should install one pendent sprinkler to cover the area behind the sidewall sprinkler (the area under the west soffit). As a result, we need to install one sidewall and one pendent sprinkler.
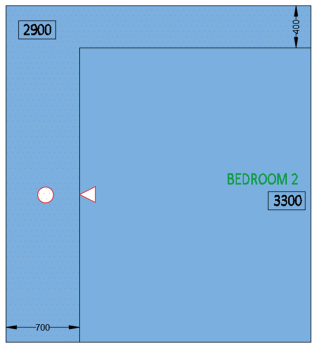 Figure 20 - Option 1 (Plan view)
Option 2: Installing sidewall sprinkler on the face of the north soffit:
Where we install the sidewall sprinkler on the face of the north soffit, the west soffit with a width of 700 mm would be an adjacent obstruction. It seems that we should follow section 8.10.7.1.4(3) and Figure 8.10.7.1.4(b) for the west soffit. Before calculating the “A” through the “A ≥ (D – 200 mm) + B” formula, let`s review an important note. The north soffit is 400 mm wide, so a pendent sprinkler must be installed under it where the sidewall sprinkler is installed on the face of the soffit. We should remember this pendent sprinkler can effectively protect all areas beneath other soffits at the same elevation within the coverage zone.
In the figure below, the green square represents the nominal coverage of the pendent sprinkler (6100 x 6100 mm), while the actual coverage, limited to the area under both soffits, is shown in the blue shaded.
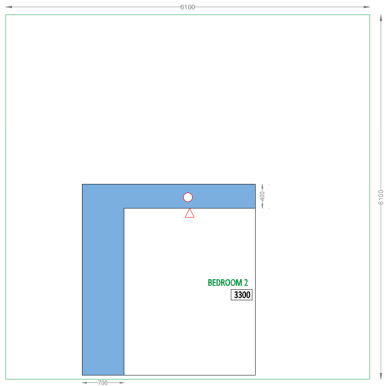 Figure 21 – Coverage area of the pendent sprinkler
As the pendent sprinkler covers the area beneath the north and west soffits, we can ignore the west soffit as an obstruction to the sidewall sprinkler. Therefore, the sidewall can be installed in any location on the face of the north soffit except within 100 mm (4 in.) from the east wall or west soffit (Per section 8.10.4.6.1). In the following figure, the thick blue line shows the locations for the sprinkler installation.
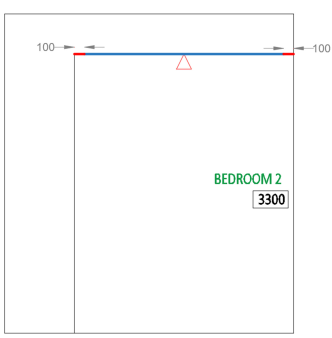 Figure 22 – Location for the sidewall sprinkler installation
Option 3: Installing sidewall sprinkler on the south wall:
The WIC (located in the south of Bedroom 2) has a suspended ceiling, so we can pass the pipe above its ceiling and penetrate the south wall of “Bedroom 2”, then install the sidewall sprinkler. With this option, we have two obstructions:
- North soffit as a front obstruction: The width and height of this soffit are not more than 600 mm, so it can be ignored per Section 8.10.7.1.6.
- West soffit as an adjacent obstruction: The soffit`s width is 700 mm.
So, we should apply section 8.10.7.1.4(3) and “A ≥ (D – 200 mm) + B” formula. In this formula:
A: The minimum horizontal distance between the sprinkler and the face of the soffit
D: The width of the soffit
B: The distance between the deflector of the sprinkler and the bottom of the soffit
In Bedroom 2, “D” is 700 mm. The depth of the soffit is 400 mm, and according to the datasheet of the sidewall sprinkler, the maximum distance between the deflector and the ceiling is 150 mm. So “B” will be 250 mm.
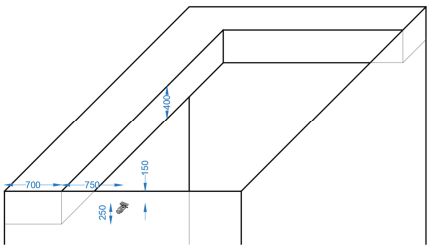 Figure 23 - Dimensions for applying “A ≥ (D – 200 mm) + B” formula
Therefore:
A ≥ (D – 200 mm) + B
A ≥ (700 – 200 mm) + 250
A ≥ 750 mm
This means that if we locate the sidewall sprinkler less than 750 mm away, the soffit will be considered an obstruction; therefore, discharged water from the sprinkler can not reach the area under the soffit. In the following figure, the uncovered area is shown in red.
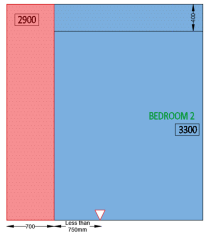 Figure 24 - Sprinkler does not cover the area under the soffit
If we install the sidewall sprinkler at least 750 mm away from the west soffit, the sprinkler can cover the area under the soffit.
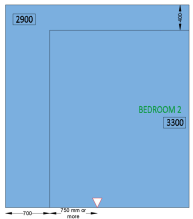 Figure 25 - Option 3 (plan view)
With option 3, we need one sidewall sprinkler to cover the room and meet the NFPA 13 requirements.
Locating sprinkler in Bedroom 3:
Bedroom 3 has two soffits on the west and south walls. The width of the west soffit is 200 mm, while the south soffit is 400 mm wide. In this room, the wall configuration may create shadows depending on the location of the sprinkler.
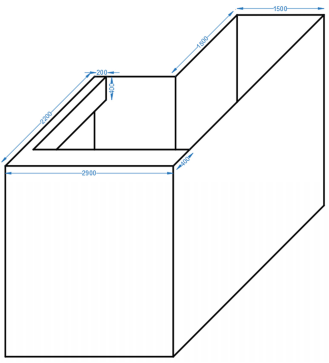 Figure 26 - Bedroom 3
In reference to Figure 1, the closet and the bathroom located north of bedroom 3 have suspended ceilings, allowing for the installation of sidewall sprinklers on the shared walls. Let’s study the options.
Option 1: Installing sidewall sprinkler on the face of the south soffit:
The width of the soffit is 400 mm, so we need one pendent sprinkler if we install the sidewall sprinkler on the face of the south soffit. The width of the west soffit is 200 mm, so it can be ignored as an adjacent obstruction. Even if the width of the west sofit was more than 600 mm, the pendent sprinkler that is required to install under the south soffit, could cover the area beneath the west soffit.
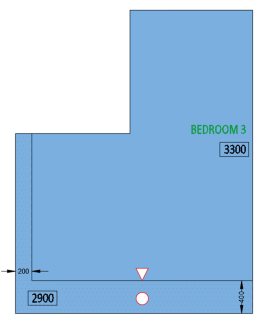 Figure 27 - Option 1 (Plan view)
Option 2: Installing sidewall sprinkler on the face of the west soffit:
In this option, there's no need to install the pendent sprinkler under the west soffit, per Section 8.10.7.1.5.1. Also, the width of the south soffit is not more than 600 mm, so this soffit can be ignored, following section 8.10.7.1.4(4). Where we install the sidewall sprinkler, the horizontal shared wall between bedroom 3 and the closet creates a shadow. It is important to note that the maximum acceptable shadow area is not defined in NFPA 13, 2016 Edition. However, in NFPA 13R-2013/2016 [6.4.6.3.3.1], NFPA 13D-2013 [8.2.5.7], NFPA 13D-2016 [8.2.5.6], NFPA 13-2019 [12.1.10.2.3], and NFPA 13-2022 [12.1.10.2.3], the maximum acceptable shadow area is determined to be 1.4 m² (15 ft²). This example assumes that the Authority Having Jurisdiction (AHJ) has agreed to this value. So, we should find a location for the sidewall sprinkler so that the shadow would not exceed 1.4 m².
The following figure shows the shadow area with a trapezoid shape.
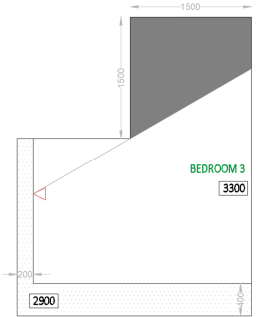 Figure 28 - Shadow area
From the geometry, we know that the area of the trapezoid can be found by the following:
Area = (B1 + B2) × height ÷ 2
Where:
B1 and B2 are the lengths of the two parallel sides of the trapezoid
height is the perpendicular distance between the two parallel sides
In our example, we know the area (1.4 m²), and we should find the B2:
1.4 = (1.5 + B2) × 1.5 ÷ 2
B2= 0.36 m (360 mm)
To determine the sidewall sprinkler locations, draw a 360 mm line on the east wall, starting at the room's northeast corner. From this point, a new line will be extended to the intersection of the closet and bedroom 3 walls. Continue this line to the face of the west soffit to identify the placement for the sidewall sprinklers.
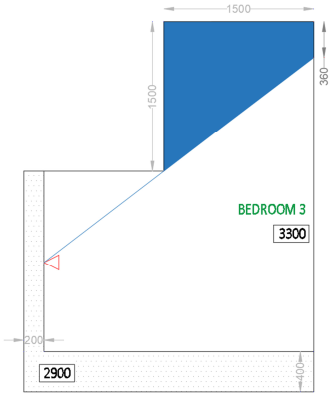 Figure 29 - Acceptable shadow area
Placing the sprinkler above the determined location creates a shadow of more than 1.4 m². As we install the sidewall sprinkler closer to the south soffit, the area of the shadow gets smaller, but we should remember that the distance between the sprinkler and the north wall shall not be greater than half of the spacing (2750 mm) of the sidewall sprinkler.
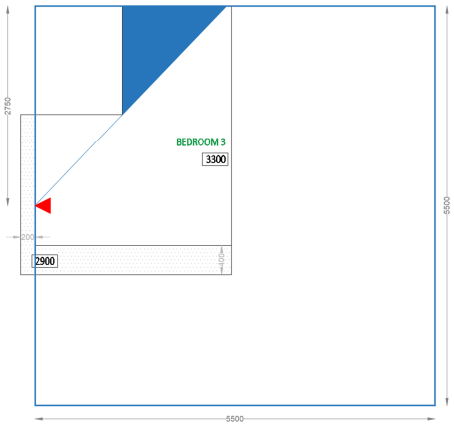 Figure 30 - Room area is under the sprinkler coverage
To effectively protect bedroom 3 with a single sidewall sprinkler, we must install it precisely along the thick blue line indicated in the figure below. Positioning the sprinkler above this line would result in the shadow area exceeding 1.4 m² while placing it below the line would leave the north wall out of the coverage area.
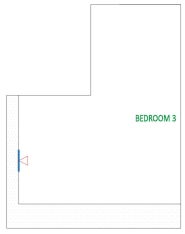 Figure 31 - Blue line shows the acceptable locations for the sidewall sprinkler
Option 3: Installing sidewall sprinkler on the horizontal wall between the closet and bedroom 3:
As we know, the west and south soffits would not be an obstruction based on sections 8.10.7.1.4(4) and 8.10.7.1.6. Installing the sidewall sprinkler on the horizontal wall between the closet and bedroom 3 leaves the area at the corner of the room unprotected, shown in colorless.
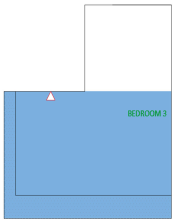 Figure 32 - The area is not covered by sprinkler is shown colorless
To protect this area, we can install an additional sidewall sprinkler on the vertical wall between the closet and bedroom 3 or the shared wall of the bathroom and bedroom 3.
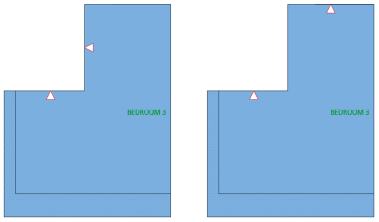 Figure 33 - Options for protecting the entire room area
Option 4: Installing sidewall sprinkler on the vertical wall between the closet and bedroom 3:
Similar to option 3, this option leaves an uncovered area.
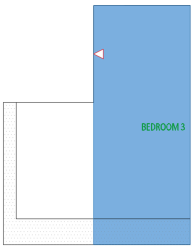 Figure 34 - The area is not covered by sprinkler is shown colorless
We should protect it with an additional sprinkler.
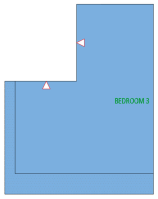 Figure 35 - The entire room area is protected
It is worth noting that if we install a sidewall sprinkler on the face of the west soffit to protect uncovered area, we shouldn`t worry about the shadow of the walls because it is covered by the first sidewall sprinkler that is installed on the vertical shared wall. In the figure below, the shadow of the second sprinkler is depicted in light blue. Although the shadow area exceeds 1.4 m², it is acceptable because the first sprinkler can cover it.
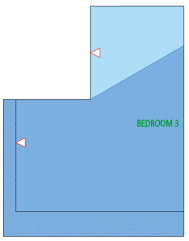 Figure 36 - The shadow area of the second sprinkler is covered by the first sprinkler
Option 5: Installing sidewall sprinkler on the shared wall of bathroom and bedroom 3:
If we apply this option, we must address the shadow area in a manner similar to Option 2. To protect bedroom 3 with a single sidewall sprinkler, it is necessary to install it along the thick blue line shown in the figure below. Placing the sprinkler on the left side of this line would create an excessive shadow area exceeding 1.4 m², while positioning it to the right would violate the minimum wall distance requirement specified in 8.10.4.6.1.
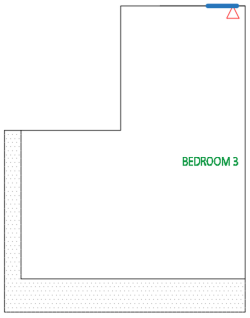 Figure 37 - Blue line shows the acceptable locations for the sidewall sprinkler
In bedroom 3, we can’t install the sidewall sprinkler on the east wall, because we have no space for running the pipe. For rooms without soffits, sprinkler designers may consider adding a soffit for optimal placement. However, it's essential to note that the soffit width should not exceed 200 mm to avoid the need for an additional sprinkler unless the ceiling pocket rule applies, and room would be protected just by pendent sprinkler under the soffit.
Locating sprinkler in Great Room:
The great room has three soffits on the north, east, and south of the corridor. In this room, we have many options to locate sprinklers. We will study some of them.
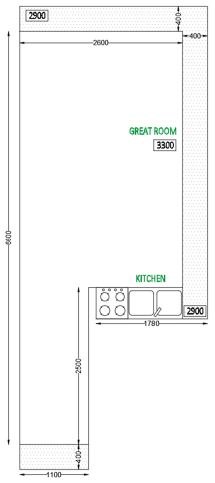 Figure 38 - The layout of Great Room
Option 1: Installing sidewall sprinkler on the face of the east and south soffits:
The width of both soffits is 400 mm, so we should install pendent sprinklers to cover the area under them.
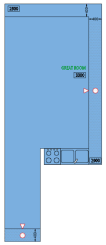 Figure 39 - Option 1
Option 2: Installing sidewall sprinkler on the face of the east and south soffits:
We still need two sidewalls and two pendent sprinklers when we apply this option.
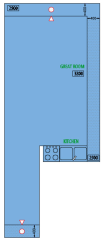 Figure 40 - Option 2
Option 3: Installing sidewall sprinkler on the shared walls of bathroom and closet:
Refer to Figure 1, the great room has shared walls with the bathroom and closet that is located on the right side of the corridor. When we install sidewall sprinklers on these walls, the room can be protected with two sidewall sprinklers. To prevent cold soldering, the two sprinklers must not be located within each other's coverage zones, as per section 8.10.3.4.
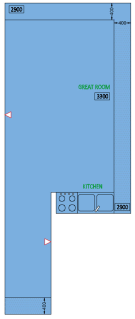 Figure 41 - Option 3
Locating sprinklers in WIC, Bathroom, Laundry, and Closets:
All these rooms have suspended ceilings. We install the pendent sprinkler to protect them. Due to their relatively small room size, a single pendent sprinkler per room is generally sufficient for adequate protection. In the laundry, however, sprinkler placement must carefully consider potential shadow zones.
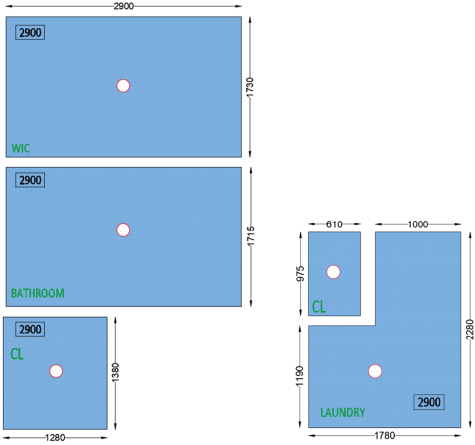 Figure 42 - Locations of pendent sprinklers
Optimum Design:
After carefully evaluating various sprinkler placement options within the suite, we are now ready to select the most optimal design. By prioritizing efficiency and minimizing costs, we can create a design that optimizes the use of sprinklers, piping, and labor resources.
Table 3- Minimum required sprinklers in rooms
In Bedroom 1, options 2 and 3 require one sidewall sprinkler. We choose option 2 to minimize pipe length and labor costs.
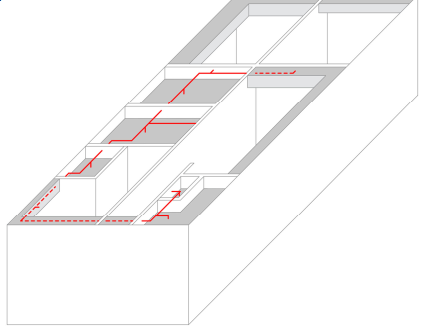 Figure 43 - Piping network
Obstruction Rules for Pendent/Upright Residential Sprinklers:
In our example, we didn`t have a situation to locate a pendent/upright sprinkler near an obstruction, so we will review the requirements in this section. Like a sidewall sprinkler, where an obstruction is within the coverage of a sprinkler, and the water can only pass under it, we should follow the beam rule [Table 8.10.6.1.2 & Figure 8.10.6.1.2(a)]. For obstructions against the wall (like the soffit), NFPA 13 permits follow the “Soffit Rule.”
The soffit rule for these sprinklers differs from that for sidewall sprinklers.
For the soffit`s width up to 600 mm (24 in) and B ≥ 450 mm (18 in.): The soffit can be ignored based on section 8.10.6.1.2(4) and Figure 8.10.6.1.2(c). This means no protection is required for the area under the soffit.
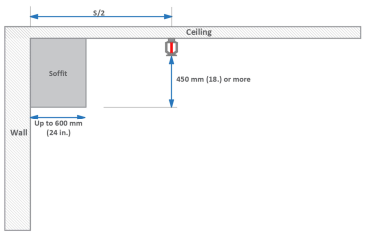 Figure 44 - No protection is required for the area under the soffit
For the soffit`s width up to 750 mm (30 in): Where the width of the soffit is up to 600 mm and the “B” is less than 450 mm, or in a situation where the width of the soffit is more than 600 mm up to 750 mm, section 8.10.6.1.2(3) and Figure 8.10.6.1.2(b) shall be met.
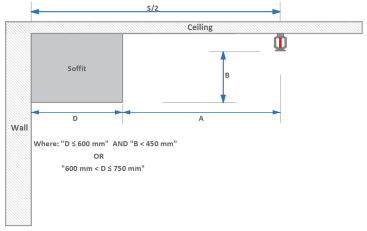 Figure 45 - If “A ≥ (D – 200 mm) + B”, No protection is required for the area under the soffit
Sprinkler Layout App:
The Sprinkler Layout App within NSVCad software is a valuable tool that streamlines the process of ensuring compliance with NFPA standards for locating Standard Spray, Extended Coverage, and Residential sprinklers. To apply it, users must specify the walls, soffits, sprinkler type, orientation, coverage, and the reference standard (13, 13R, or 13D).
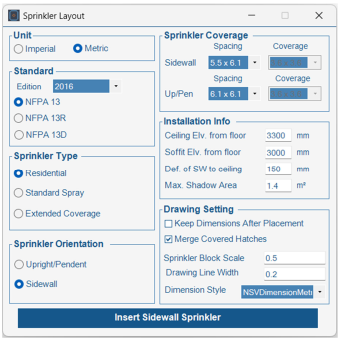 Figure 46 - Sprinkler Layout Tool
Once the necessary parameters have been set, users can select the wall or soffit where they want to install the sprinkler. The sprinkler will then appear on the screen, and as the user moves it around, the app will show the area covered in blue. Any areas not covered by the sprinkler will be displayed in red, indicating that water cannot reach those areas due to soffit rules, shadows, or other factors.
This app has various features, including:
- Applying appropriate requirements for front and adjacent soffits based on the location of the sidewall sprinkler.
- Checking whether the “ceiling pocket” or “Small Room” rule is applicable.
- Creating a shadow based on wall configuration and sprinkler location. If the shadow area exceeds the permitted value (e.g. 15 ft² or 1.4 m²), the hatch color of the shadow changes from blue to red.
- When installing sidewall sprinklers on the face of the soffit, the app will automatically place the pendent sprinkler under the soffit if it is wider than 200 mm (8 in.).
- Warning the user when a sidewall sprinkler is within another coverage area.
- Restricting the user from placing a sprinkler closer than 100 mm (4 in.) from the wall or soffit.
- Displaying relevant sections of NFPA when the user presses the CTRL key.
To learn how this app helps in designing fire sprinkler systems, please watch the video of “Sprinkler Layout Tool” on www.nsvsoft.net
Summary:
This article has examined the Beam and Soffit Rules governing residential sprinklers. These rules apply when water can pass through under the obstruction. (If water can pass through both sides of the obstruction, the three- or four-times rule, determined by the sprinkler type, must be implemented.) Based on the discharge pattern of sprinklers, The higher a sprinkler is positioned above an obstruction, the greater the distance required between the sprinkler and the obstruction.
For residential sidewall sprinklers, soffits within the coverage of the sprinkler can be divided into three different categories:
Soffit behind the sprinkler:
Soffit Width Up to 200 mm: No protection is required for the area under the soffit.
Soffit Width more than 200 mm: Install an additional sprinkler to cover the area beneath the soffit.
Soffit in front of the sprinkler
Soffit Width and Height Up to 600 mm: The soffit can be ignored.
Soffit Width or Height more than 600 mm: Apply the beam rule.
If the beam rule is insufficient: Install an additional sprinkler to cover the area beneath the soffit.
Soffit adjacent to the sprinkler
Soffit Width Up to 600 mm: The soffit can be ignored.
Soffit Width over 600 and up to 800 mm: Apply the formula A ≥ (D - 200 + B).
Soffit Width Over 800 mm: Apply the beam rule.
If the beam rule is insufficient: Install an additional sprinkler to cover the area beneath the soffit.
It's important to note that in some cases, the soffit rules vary between NFPA 13, 13R, and 13D standards and may differ depending on the specific edition. This can significantly increase design complexity. Therefore, careful consideration of these rules is essential to ensure accurate and compliant sprinkler system design. In NSVCad, we considered all these differences, and this software can help you design fire sprinkler systems more easily and quickly.
References:
National Fire Sprinkler Association, NFSA.:
2022. Layout, Detail, and Calculation of Fire Sprinkler Systems: 3rd Edition
Kenneth Isman, 2012, “Shadow Area Summary”, TechNotes #250
Roland Asp, 2023, “Best of March 2023”, TechNotes #509


No comments yet. Be the first to share your thoughts!