
Translating with Sprinky AI...
Sprinky AI Translation AssistantA sprinkler near a beam must do more than discharge water around an obstruction. It must also be positioned so that heat can reach it promptly. Placing a sprinkler too close to a beam can interfere with both its discharge pattern and its activation.
The beam rule addresses this relationship through horizontal and vertical clearances. Applying it correctly starts with identifying the obstruction’s position relative to the sprinkler deflector, then checking the required separation, any applicable exception and the coverage beneath the beam.
The examples below focus on NFPA 13 and standard spray sprinklers, and the software example uses the 2025 edition. Always check the requirements for the applicable sprinkler type, construction and project edition in NFPA 13, rather than treating example dimensions as universal clearances.
Key Takeaways
- The beam rule relates horizontal sprinkler clearance to the deflector’s height above the obstruction’s underside.
- The opposite-side sprinkler exception applies only to beams no wider than 4 feet and requires compliant spacing.
- Supplemental sprinkler coverage depends on the total deflector-to-ceiling distance, not simply placement beneath a beam.
- NSVCad displays obstruction-related coverage limits, calculates beam rule clearances and flags cold soldering concerns.
Table of Contents
- Start with the 18-Inch Obstruction Distinction
- Why Sprinkler Placement Near Beams Matters
- How to Apply the Beam Rule: Dimensions A and B
- The Beam Rule Exception for Beams No Wider Than 4 Feet
- Coverage from a Supplemental Sprinkler Beneath a Beam
- Applying the Beam Rule in NSVCad
- A Complete Beam Check Looks Beyond One Clearance
Start with the 18-Inch Obstruction Distinction
NFPA 13 distinguishes between two obstruction conditions based on the vertical distance below the sprinkler deflector. This distinction matters because the two conditions affect sprinkler performance differently.
- Any part of the obstruction is within 18 inches vertically below the deflector: the concern is interference with sprinkler discharge development. The applicable requirements can include the three-times rule, four-times rule and beam rule.
- The entire obstruction is more than 18 inches below the deflector: the concern is whether the obstruction prevents discharge from reaching the hazard. These requirements are generally less restrictive, and the wide obstruction rule generally applies.
The beam rule applies to continuous obstructions within the relevant 18-inch vertical zone where the only path for water to reach the area beyond the obstruction is underneath it. We therefore need to consider both the sprinkler’s height and its horizontal distance from the beam.
Why Sprinkler Placement Near Beams Matters
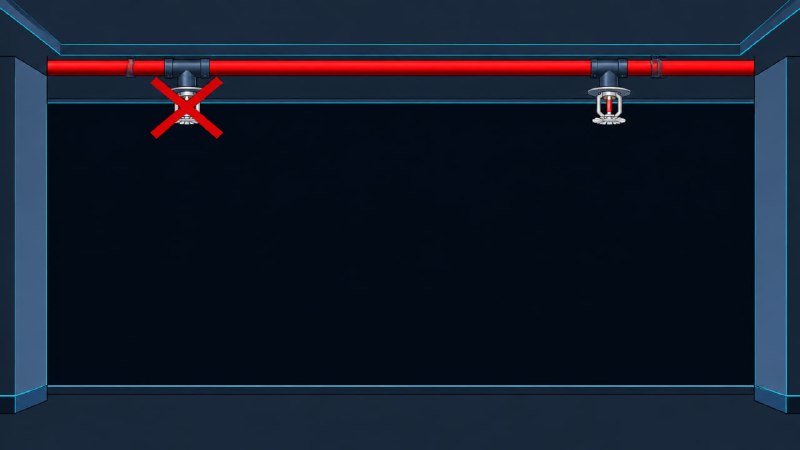
There are two important reasons not to place a sprinkler arbitrarily close to a beam.
The first is discharge development. Water needs sufficient clearance to form the intended spray pattern. A beam beside the sprinkler can interrupt that pattern and prevent water from reaching part of the protected area.
The second is timely activation. Heat from a fire rises and spreads beneath the ceiling as a ceiling jet. A beam can interrupt that movement, leaving a nearby sprinkler in its thermal shadow and delaying activation.
Checking only whether water appears able to pass beneath a beam is therefore not enough. Sprinkler positioning must account for the obstruction’s effect on both discharge and heat movement.
How to Apply the Beam Rule: Dimensions A and B
The beam rule relates two dimensions:
- A: the horizontal distance from the sprinkler to the near edge of the obstruction.
- B: the vertical distance by which the sprinkler deflector is above the bottom of the obstruction.
NFPA 13 provides figures and tables that establish the permitted relationship for each applicable sprinkler type. The basic principle is straightforward: the farther the deflector is above the bottom of the beam, the farther the sprinkler must be from the beam’s near edge.
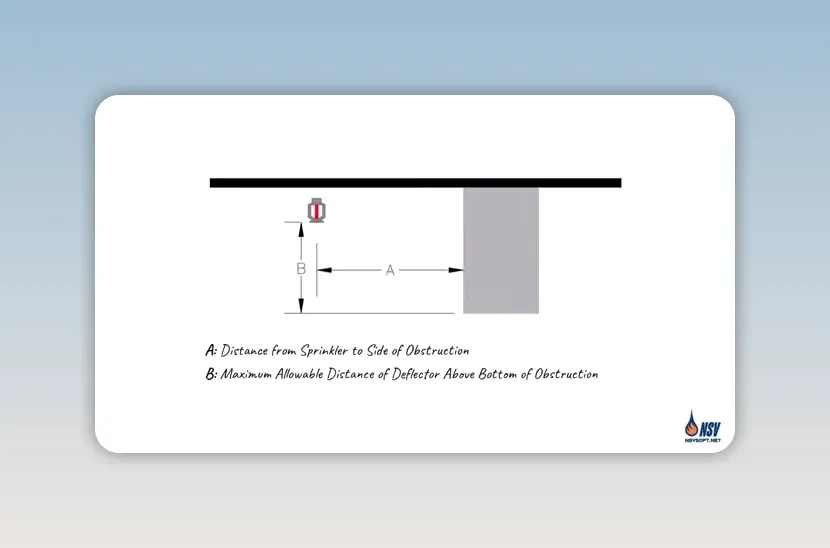
For upright or pendent standard spray sprinklers, the examples are:
- When B is 2.5 inches, A must be at least 1 foot.
- When B is 5.5 inches, A must be at least 2 feet.
These examples show why a sprinkler location that works beside a shallow beam may not work beside a deeper one. Raising the sprinkler without moving it horizontally can also change the clearance required.
A practical checking sequence is:
- Establish the sprinkler deflector elevation.
- Determine the elevation of the beam’s underside.
- Calculate the vertical difference, B.
- Use the applicable NFPA 13 figure and table to determine the required A.
- Compare that requirement with the actual horizontal distance to the beam’s near edge.
The Beam Rule Exception for Beams No Wider Than 4 Feet
NFPA 13 permits an exception to the beam rule for a beam no wider than 4 feet. An additional sprinkler can be installed on the opposite side, provided that it is positioned within one-half of the allowable sprinkler spacing from the beam’s centreline.
Under this arrangement, one sprinkler is treated as covering half of the area beneath the beam, while the sprinkler on the opposite side covers the remaining half. The beam’s centreline becomes the dividing line between those coverage areas.
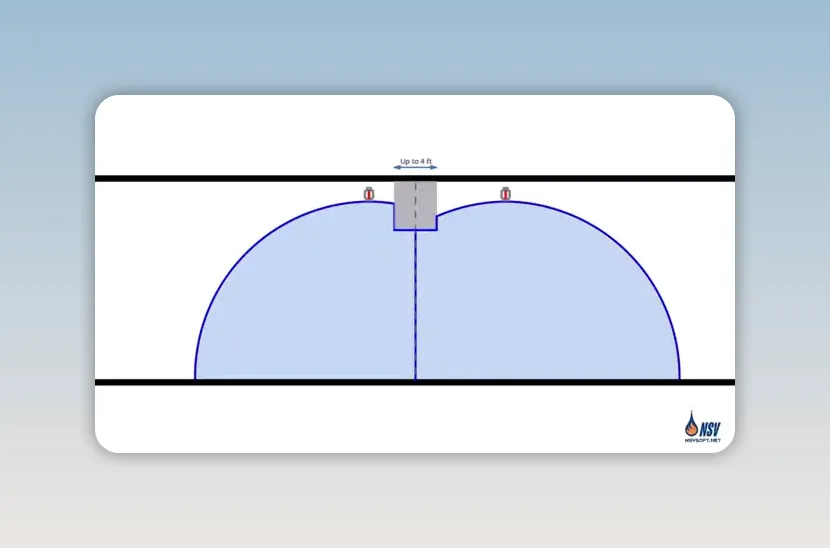
The important point is that adding a sprinkler on the opposite side is not, by itself, enough. Beam width and the permitted distance from the centreline must also satisfy the exception.
What changes when the beam is wider than 4 feet?
For a beam wider than 4 feet, this exception does not apply. Where the beam rule is not satisfied, sprinklers on either side provide coverage only up to their respective near edges of the obstruction. We cannot assume that their coverage extends beneath the beam to meet at its centreline.
In that situation, the sprinkler placement must satisfy the beam rule, or a supplemental sprinkler must be added to provide coverage beneath the beam.
Coverage from a Supplemental Sprinkler Beneath a Beam
A sprinkler beneath a beam does not automatically provide full coverage beyond the beam’s footprint. Its coverage depends on the distance between its deflector and the ceiling, using the limits applicable to the construction and sprinkler type.
For the standard spray sprinkler example in unobstructed construction, the deflector-to-ceiling range is 1 to 12 inches. When placing a sprinkler beneath a beam, we must therefore calculate the total distance back to the ceiling:
Deflector-to-ceiling distance = beam depth + distance from the beam’s underside to the deflector
- If the total is 12 inches or less: the sprinkler can provide full coverage in this example, subject to the applicable installation requirements.
- If the total exceeds 12 inches: coverage is limited to the area directly beneath the beam.
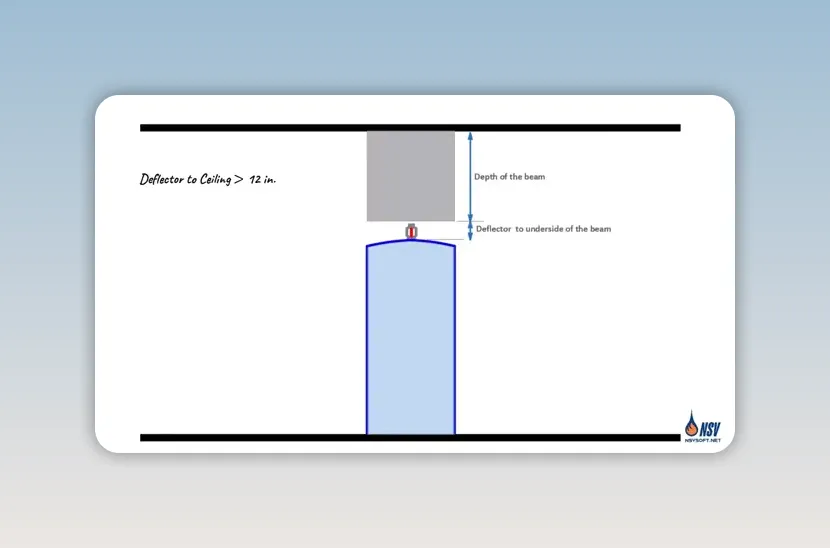
This is an important distinction when completing a layout. A supplemental sprinkler may resolve the unprotected area beneath an obstruction without replacing the ceiling sprinklers needed on either side.
Applying the Beam Rule in NSVCad
The NSVCad beam rule tool makes these relationships visible while positioning sprinklers. Consider a 150 by 100-foot building with unobstructed construction, with beam depths and widths identified in the layout.
For this example, we select:
- Reference standard: NFPA 13, 2025 edition.
- Sprinkler type: standard spray.
- Deflector-to-ceiling distance: 4 inches.
- Maximum deflector-to-ceiling distance: 12 inches for the illustrated construction and sprinkler arrangement.
Insert a sprinkler and inspect the coverage
After selecting Insert, the sprinkler and its coverage appear in the drawing. The colour display distinguishes between the areas that are clear of beam interference and those affected by the obstruction:
- Blue coverage indicates that the obstruction does not interfere with the discharge pattern.
- Red coverage identifies an area that the discharge cannot reach because the beam rule is not met.
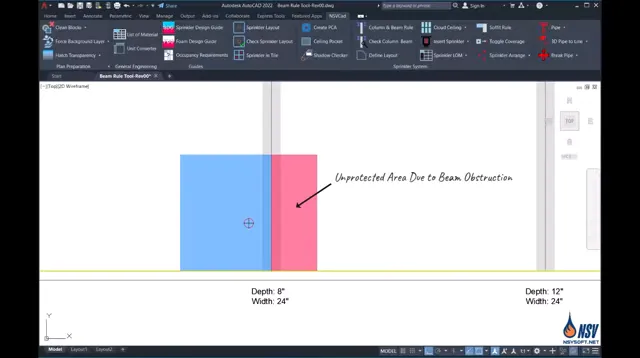
Check the calculated clearance
Pressing the Control key opens the More Info window. The software calculates B from the beam depth and the selected deflector-to-ceiling distance, then uses the referenced NFPA 13 table to determine the required A.
The window also displays the actual distance between the sprinkler and the beam. This allows us to compare the required clearance with the current placement rather than relying only on the coloured coverage display.
Recognise the centreline and near-edge limits
When a sprinkler is too close to a beam and does not meet the beam rule, NSVCad displays the coverage boundary differently according to beam width:
- Beams no wider than 4 feet: coverage extends to the beam’s centreline, helping us arrange the opposite-side sprinkler needed for the exception.
- Beams wider than 4 feet: coverage stops at the beam’s near edge where the beam rule is not met.
The centreline display is an aid to applying the exception. It does not remove the need to provide the opposite-side sprinkler at the permitted spacing.
Check sprinklers positioned beneath beams
When a sprinkler is placed beneath a beam, NSVCad adds the beam depth to the minimum permitted distance between the beam’s underside and the deflector.
If that total remains within the limit permitted by the selected standard and configuration, the software displays full coverage. If it exceeds the limit, coverage is restricted to the area directly beneath the beam.
Look for cold soldering warnings
The software also checks for cold soldering. A CS indicator beside a sprinkler warns that it is too close to an adjacent sprinkler where no obstruction separates them. This is a separate placement issue that still needs attention as sprinklers are added or moved around beams.
A Complete Beam Check Looks Beyond One Clearance
Correct sprinkler placement near beams requires a sequence of checks: identify the obstruction’s vertical position, establish A and B, assess whether the beam rule exception applies, and confirm what coverage a sprinkler beneath the beam can provide.
The goal is not simply to place sprinklers on both sides of an obstruction. It is to establish a layout that supports discharge development, timely activation and coverage of the area beneath the beam. NSVCad helps make those relationships visible as the layout develops.
Try the NSVCad Sprinkler Module
Download a free trial to explore beam rule checks, visual coverage boundaries and sprinkler placement tools.


No comments yet. Be the first to share your thoughts!