Note that depending on your chosen selection method, some blocks may temporarily disappear
from the drawing. After pressing the spacebar, all selected blocks will appear on the screen, while
other drawing components will temporarily be hidden. Select the blocks you wish to keep in your
drawing. Once you are done, press the spacebar to confirm your selection. All blocks remaining
on the screen will be erased.
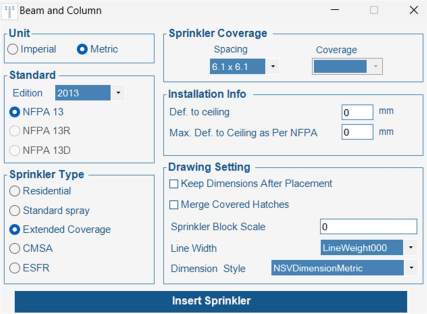
- Unit Selection: Choose between Imperial or Metric units.
- Standard Selection: Select the desired standard edition from the dropdown menu. Specify
the standard using the radio button options. - Sprinkler Type: Choose the appropriate sprinkler type using the radio button options.
- Sprinkler Coverage:
- For Standard Spray Sprinklers, CMSA and ESFR select both spacing and coverage
from the dropdown menu. - For Residential and Extended Coverage sprinklers, select the required spacing.
- Installation Information: Enter the following data in the provided text boxes:
- Deflector distance from the ceiling in account of the project specifications
- Deflector distance from the ceiling in accordance with NFPA requirements
- Drawing Settings:
- Check the box to retain dimensions after placing sprinklers or merging coverage area
hatches. - Adjust sprinkler symbol size, wall/soffit line thickness, and dimension style as
needed.
Once you’ve completed the sprinkler data entry form, click “Insert Sprinkler”. The form will close,
and you can proceed with sprinkler placement in the AutoCAD environment.
Defining the Room:
- Existing Rooms: If the room has already been defined using the “Define Layout” app, simply
click within the room to start placing sprinklers. - New Rooms:
- Rectangular Rooms: Draw a rectangle to define the room’s perimeter.
- Irregular Rooms: Use the “P” key to draw a polyline for irregular room shapes
Defining Beams:
There are some options to define beams.
- Create Line Beam: Draw a straight beam by pressing “L”. Specify the beam’s width and
height. - Create Rectangular Beam: Draw a rectangular beam by pressing “R”, then enter the beam
height. - Select Existing Beam: Choose an existing single-line beam by pressing “B”. Define its width
and height.
Defining Columns:
- Automatic Column Detection: Select a column on the drawing, and the software will
automatically identify and select all similar columns.
Additional Tips:
- While dragging the sprinkler, you can press the “Ctrl” button to view obstruction-related
information. - You can also select the “F” keyword to fix the sprinkler position from a specific line.
- If a sprinkler is placed closer than the minimum allowable distance specified by the
standard, a ‘CS’ indicator will appear next to it to warn of potential cold soldering. - To view beam data you can type “BeamSpec” and select the desired beam. The information
will show up in the editor window. - To edit an existing beam, type “EditBeam” and select the beam you wish to edit.
Notes:
The current version of the Sprinkler Layout app is optimized for rooms with rectangular shapes and
0% slope ceilings.