Find ACA

Command: NAC
Video: www.nsvsoft.net/videos/aca
Description: Calculates the Actual Coverage of Sprinklers.
How To Apply:
After running the app, the following window will appear:
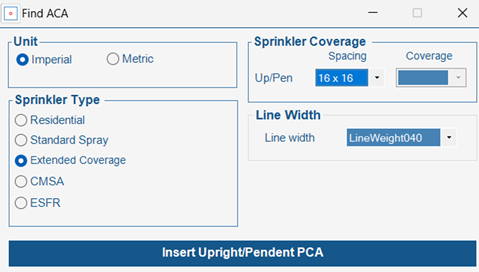
- Unit Selection: Choose between Imperial or Metric units.
- Sprinkler Type: Choose the appropriate sprinkler type using the radio button options.
- Sprinkler Orientation: Select the desired sprinkler orientation using the radio button options.
- Sprinkler Coverage:
- For Standard Spray Sprinklers, CMSA and ESFR select both spacing and coverage from the dropdown menu.
- For Residential and Extended Coverage sprinklers, select the required spacing.
- Line Widths: Select the desired line width from the drop-down menu.
Once you’ve completed the sprinkler data entry form, click “Insert Sprinkler”. The form will close, and you can proceed with sprinkler placement in the AutoCAD environment.
Defining the Room:
- Existing Rooms: If the room has already been defined using the “Define Layout” app, simply click within the room to start placing sprinklers.
- New Rooms:
- Rectangular Rooms: Draw a rectangle to define the room’s perimeter.
- Irregular Rooms: Use the “P” key to draw a polyline for irregular room shapes.
Now, select the sprinkler(s). The software displays the Potential Coverage Area of sprinkler (PCA), you can keep or delete the PCA by selecting the “Yes” or “No” options. The Actual Coverage of Sprinkler (ACA) will be shown on the drawing, also the value of “S”, “L” and the area coverage of sprinkler will be noted next to the sprinkler(s).